#mysql 8.0
Explore tagged Tumblr posts
Visit Tumblr Blog
Explore Tumblr blogs with no restrictions, modern design and the best experience.
Last Seen Tumblr Blogs


Fun Fact
Tumblr was named as a finalist in Lead411’s New York City Hot 125 in Aug 2010.
Text
MySQL 8.0 Guide: Beginner to Pro 2023
Mastering MySQL 8 0 A Comprehensive Guide is your go to reference for grasping and using the power of MySQL 8 0 in your database
0 notes
Text
BRB... just upgrading Python
CW: nerdy, technical details.
Originally, MLTSHP (well, MLKSHK back then) was developed for Python 2. That was fine for 2010, but 15 years later, and Python 2 is now pretty ancient and unsupported. January 1st, 2020 was the official sunset for Python 2, and 5 years later, we’re still running things with it. It’s served us well, but we have to transition to Python 3.
Well, I bit the bullet and started working on that in earnest in 2023. The end of that work resulted in a working version of MLTSHP on Python 3. So, just ship it, right? Well, the upgrade process basically required upgrading all Python dependencies as well. And some (flyingcow, torndb, in particular) were never really official, public packages, so those had to be adopted into MLTSHP and upgraded as well. With all those changes, it required some special handling. Namely, setting up an additional web server that could be tested against the production database (unit tests can only go so far).
Here’s what that change comprised: 148 files changed, 1923 insertions, 1725 deletions. Most of those changes were part of the first commit for this branch, made on July 9, 2023 (118 files changed).
But by the end of that July, I took a break from this task - I could tell it wasn’t something I could tackle in my spare time at that time.
Time passes…
Fast forward to late 2024, and I take some time to revisit the Python 3 release work. Making a production web server for the new Python 3 instance was another big update, since I wanted the Docker container OS to be on the latest LTS edition of Ubuntu. For 2023, that was 20.04, but in 2025, it’s 24.04. I also wanted others to be able to test the server, which means the CDN layer would have to be updated to direct traffic to the test server (without affecting general traffic); I went with a client-side cookie that could target the Python 3 canary instance.
In addition to these upgrades, there were others to consider — MySQL, for one. We’ve been running MySQL 5, but version 9 is out. We settled on version 8 for now, but could also upgrade to 8.4… 8.0 is just the version you get for Ubuntu 24.04. RabbitMQ was another server component that was getting behind (3.5.7), so upgrading it to 3.12.1 (latest version for Ubuntu 24.04) seemed proper.
One more thing - our datacenter. We’ve been using Linode’s Fremont region since 2017. It’s been fine, but there are some emerging Linode features that I’ve been wanting. VPC support, for one. And object storage (basically the same as Amazon’s S3, but local, so no egress cost to-from Linode servers). Both were unavailable to Fremont, so I decided to go with their Chicago region for the upgrade.
Now we’re talking… this is now not just a “push a button” release, but a full-fleged, build everything up and tear everything down kind of release that might actually have some downtime (while trying to keep it short)!
I built a release plan document and worked through it. The key to the smooth upgrade I want was to make the cutover as seamless as possible. Picture it: once everything is set up for the new service in Chicago - new database host, new web servers and all, what do we need to do to make the switch almost instant? It’s Fastly, our CDN service.
All traffic to our service runs through Fastly. A request to the site comes in, Fastly routes it to the appropriate host, which in turns speaks to the appropriate database. So, to transition from one datacenter to the other, we need to basically change the hosts Fastly speaks to. Those hosts will already be set to talk to the new database. But that’s a key wrinkle - the new database…
The new database needs the data from the old database. And to make for a seamless transition, it needs to be up to the second in step with the old database. To do that, we have take a copy of the production data and get it up and running on the new database. Then, we need to have some process that will copy any new data to it since the last sync. This sounded a lot like replication to me, but the more I looked at doing it that way, I wasn’t confident I could set that up without bringing the production server down. That’s because any replica needs to start in a synchronized state. You can’t really achieve that with a live database. So, instead, I created my own sync process that would copy new data on a periodic basis as it came in.
Beyond this, we need a proper replication going in the new datacenter. In case the database server goes away unexpectedly, a replica of it allows for faster recovery and some peace of mind. Logical backups can be made from the replica and stored in Linode’s object storage if something really disastrous happens (like tables getting deleted by some intruder or a bad data migration).
I wanted better monitoring, too. We’ve been using Linode’s Longview service and that’s okay and free, but it doesn’t act on anything that might be going wrong. I decided to license M/Monit for this. M/Monit is so lightweight and nice, along with Monit running on each server to keep track of each service needed to operate stuff. Monit can be given instructions on how to self-heal certain things, but also provides alerts if something needs manual attention.
And finally, Linode’s Chicago region supports a proper VPC setup, which allows for all the connectivity between our servers to be totally private to their own subnet. It also means that I was able to set up an additional small Linode instance to serve as a bastion host - a server that can be used for a secure connection to reach the other servers on the private subnet. This is a lot more secure than before… we’ve never had a breach (at least, not to my knowledge), and this makes that even less likely going forward. Remote access via SSH is now unavailable without using the bastion server, so we don’t have to expose our servers to potential future ssh vulnerabilities.
So, to summarize: the MLTSHP Python 3 upgrade grew from a code release to a full stack upgrade, involving touching just about every layer of the backend of MLTSHP.
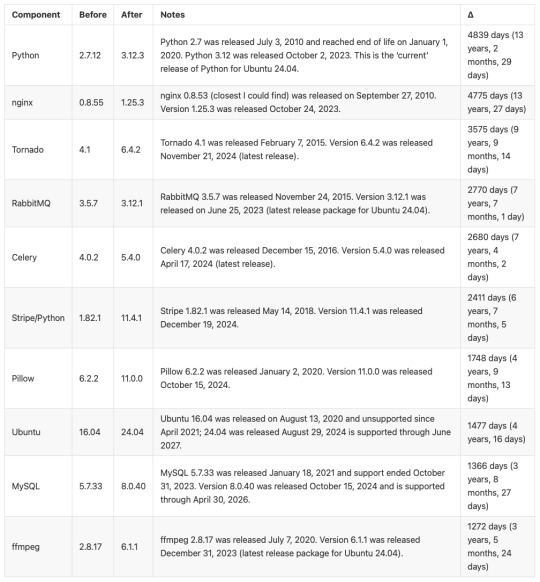
Here’s a before / after picture of some of the bigger software updates applied (apologies for using images for these tables, but Tumblr doesn’t do tables):
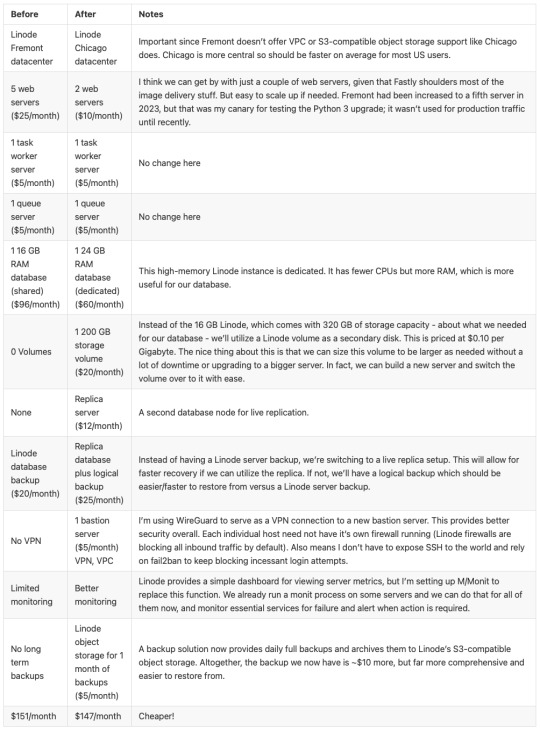
And a summary of infrastructure updates:
I’m pretty happy with how this has turned out. And I learned a lot. I’m a full-stack developer, so I’m familiar with a lot of devops concepts, but actually doing that role is newish to me. I got to learn how to set up a proper secure subnet for our set of hosts, making them more secure than before. I learned more about Fastly configuration, about WireGuard, about MySQL replication, and about deploying a large update to a live site with little to no downtime. A lot of that is due to meticulous release planning and careful execution. The secret for that is to think through each and every step - no matter how small. Document it, and consider the side effects of each. And with each step that could affect the public service, consider the rollback process, just in case it’s needed.
At this time, the server migration is complete and things are running smoothly. Hopefully we won’t need to do everything at once again, but we have a recipe if it comes to that.
15 notes
·
View notes
Quote
MySQL-8.0リリース直後くらいから2度目の中の人になっていますが、MySQL-8.0のEOLくらいで一旦何らかの区切りをつけようと考えています。具体的なことは何も決めてないのですが。昨年後半から大病を患って自身の命の有限を実感したのも契機となりました。
DB改造屋雑記: 未定ですが今後について
2 notes
·
View notes
Text
💥 Lỗi WordPress database error: Incorrect usage of UPDATE and LIMIT 💥
💥 Lỗi WordPress database error: Incorrect usage of UPDATE and LIMIT 💥 🌿 Lỗi xảy ra khi bạn chạy truy vấn UPDATE ... JOIN ... LIMIT trong MySQL, điều này không được hỗ trợ trong một số phiên bản MySQL/MariaDB (thường là MySQL < 8.0 hoặc MariaDB). 🧠 Phân Tích Lỗi Bạn đang dùng truy vấn: UPDATE wp_postmeta a JOIN wp_postmeta b ON b.post_id = a.post_id SET a.meta_value = b.meta_value WHERE a.meta_key…
0 notes
Video
youtube
How To Install PHP 8.0 Apache Mysql 8.0 On Ubuntu 25.04
0 notes
Text
Neo Billing Nulled Script 8.0

Download Neo Billing Nulled Script – The Ultimate Invoicing & CRM Solution Neo Billing Nulled Script is a powerful and flexible solution designed for small and medium-sized businesses that need an all-in-one platform to manage accounting, invoicing, billing, and customer relationship management (CRM). If you're looking for a robust yet user-friendly tool to streamline business operations without spending a dime, this is the ideal choice. Why Choose Neo Billing Nulled Script? Business management tools can be expensive, but with Neo Billing you can access premium features for free. This script brings enterprise-level functionality to your fingertips without the heavy price tag. It’s the perfect alternative for entrepreneurs, freelancers, and startups who need efficiency without compromising on features. Detailed Product Description The Neo Billing is a comprehensive solution that combines billing, invoicing, accounting, and CRM into one platform. It’s tailored to support various industries and is easy to configure to suit your specific business needs. With its intuitive dashboard, managing sales, purchases, clients, and suppliers becomes effortless. Whether you're tracking expenses, creating detailed financial reports, or automating invoice generation, this tool simplifies it all. Download it today and experience a next-level digital accounting solution that saves time and boosts productivity. Technical Specifications Script Type: PHP, MySQL-based Responsive Design: Fully responsive and mobile-friendly UI Server Requirements: PHP 7.x+, MySQL 5.6+ Installation: One-click installer included File Size: Lightweight and optimized for performance Features and Benefits Invoicing Automation: Easily create, send, and track invoices Expense Management: Keep control over company expenses Client Management: Store and manage detailed customer records Multi-Currency Support: Ideal for global business operations Customizable Templates: Personalized invoice and report templates Role-Based Access: Assign and manage user permissions Real-World Use Cases Here are just a few ways Neo Billing Nulled Script can be used in the real world: Freelancers: Manage clients and automate invoicing seamlessly Agencies: Keep track of staff, payments, and customer projects Retail Businesses: Generate accurate sales reports and manage stock levels Startups: Control budgets and keep investors updated with real-time financial data How to Install Neo Billing Nulled Script Download the latest version of Neo Billing Nulled Script from our site. Unzip the package and upload the files to your server. Create a new MySQL database and import the included SQL file. Run the web-based installer and follow the on-screen instructions. Log in to your admin dashboard and start customizing your setup. That’s it! You’re now ready to enjoy a full-featured CRM and accounting solution at zero cost. Frequently Asked Questions (FAQs) Is the Neo Billing Nulled Script safe to use? Yes, the version provided on our site is scanned and tested to ensure it's free from malware or harmful code. Can I use it for commercial projects? Absolutely! The Neo Billing Nulled Script is perfect for commercial and freelance projects where cost efficiency is crucial. Does it support multi-user access? Yes, it comes with role-based access control, so multiple users can access different areas of the system securely. Where can I download similar nulled tools? We highly recommend checking out our other offerings like Impreza NULLED for stunning WordPress themes, and the powerful Slider Revolution Nulled plugin for dynamic sliders and web visuals. Final Thoughts If you're serious about optimizing your business processes without spending hundreds on software, Neo Billing is the ideal solution. Easy to use, feature-rich, and completely free—this script provides all the tools needed to take your business management to the next level. Download now and empower your workflow
0 notes
Text
How to Install TYPO3: A Complete Beginner’s Guide
TYPO3? Super robust. But getting it going is more than just flipping a switch. You want guidance that’s clear, practical, and won’t leave you Googling every second step.

Why Install TYPO3 with Composer?
Using Composer makes installation faster, cleaner, and easier to manage. It keeps your TYPO3 project structured, helps you stay up-to-date, and is the method recommended by the TYPO3 community.

Step 1: Check System Requirements
Make sure your server environment is ready. TYPO3 needs:
PHP 8.1 or higher
MySQL 8.0 or MariaDB 10.3+
Apache or NGINX web server
Composer installed
SSL (recommended)
Minimum 2 GB RAM for smooth setup
Step 2: Set Up the TYPO3 Project
Use Composer to create your TYPO3 project. This will download the necessary files and prepare the folder structure. Once done, move into your project directory to continue.
Step 3: Configure the Web Server
Your web server needs to point to the public folder inside your TYPO3 project. This is where TYPO3 stores all public-facing files. Make sure URL rewriting is enabled so TYPO3 can handle clean URLs properly.
Step 4: Create a Database
Set up a new, empty database. TYPO3 will use this to store content, users, configuration, and all your website data.
Step 5: Run the Web Installer
Open your TYPO3 site in a browser. The TYPO3 installer will guide you through:
Connecting to your database
Creating the admin user
Finishing the basic setup
The setup takes just a few minutes if all requirements are met.
Step 6: Log In and Get Started
After installation, you can access the TYPO3 backend. Use the admin account you just created to log in. From here, you’re ready to start adding pages, installing extensions, and managing your website.
Optional: Add a Site Package
If you want a ready-made starting point, you can install a TYPO3 site package. These packages include pre-configured templates and demo content to help you explore TYPO3 faster.
Final Thoughts
Installing TYPO3 is simple if you follow these steps:
Check your system
Set up the project with Composer
Configure the web server
Create a database
Run the installer
Log in and build your site
TYPO3 is ideal for professional websites that need long-term flexibility, structure, and performance.
0 notes
Text
The Complete Guide to Migrating Your TYPO3 Website to TYPO3 v13
Introduction
Upgrading your TYPO3 website to TYPO3 v13 is a significant step that enhances performance, security, and user experience. This comprehensive guide provides a step-by-step roadmap to ensure a smooth and successful migration.

Understanding the Advantages of TYPO3 v13
Before migrating, it’s important to know what TYPO3 v13 brings:
Enhanced Performance: Faster page loads and a more responsive backend.
Improved Security: Latest security updates to protect your website.
New Features: Better content management tools and user-friendly enhancements.
Future-Proofing: Ensures long-term support and compatibility with new technologies.
Preparing for the Migration
A well-planned upgrade reduces risks. Here’s what you should do:
✔️ Backup Everything
Make a full backup of your website files and database.
Store it securely in case something goes wrong during migration.
✔️ Check System Requirements
TYPO3 v13 requires:
PHP 8.2+
Databases: MySQL 8.0+, MariaDB 10.3+, PostgreSQL 12+, SQLite 3.31.0+
Web Server: Apache, Nginx, or IIS (latest versions recommended)
✔️ Review Installed Extensions
Check if your extensions are compatible with TYPO3 v13.
Update them or find alternatives if they are no longer supported.
The Migration Process: Step-by-Step
Follow these steps to upgrade your website safely:
🔹 Update the TYPO3 Core
Download the latest TYPO3 v13 package.
Replace the old core files with the new ones.
🔹 Run the Upgrade Wizard
TYPO3 provides built-in Upgrade Wizards that update your database and configurations.
Follow the wizard's recommendations to ensure smooth migration.
🔹 Test Your Website Thoroughly
Check if all pages, extensions, and features work properly.
Fix broken links, missing images, or layout issues.
Conclusion
Upgrading to TYPO3 v13 enhances your website’s performance, security, and future readiness. By following these steps, you can ensure a smooth transition with minimal disruptions. Stay updated, monitor your website, and enjoy the latest features of TYPO3 v13!
#TYPO3#TYPO3UpgradeGuide#TYPO3v13#TYPO3WebsiteMigration#TYPO3Community#SEO#TYPO3CMSUpdate#TYPO3v13Migration
0 notes
Link
0 notes
Text
Hướng dẫn các bước Backup MySQL Database cập nhật mới nhất

Backup MySQL Database là một bước quan trọng và không thể thiếu trong quản lý hệ thống cơ sở dữ liệu. Đối với MySQL, việc sao lưu cơ sở dữ liệu không chỉ giúp bảo vệ dữ liệu khỏi các sự cố không mong muốn mà còn hỗ trợ trong việc khôi phục dữ liệu một cách nhanh chóng và hiệu quả. Dưới đây là hướng dẫn chi tiết và cập nhật mới nhất về Backup MySQL Database.
1. Tại sao Backup MySQL Database quan trọng?
Sao lưu cơ sở dữ liệu MySQL giúp bạn bảo vệ dữ liệu khỏi mất mát do các sự cố như:
Lỗi phần cứng: Các lỗi này có thể xảy ra bất ngờ và gây mất dữ liệu nếu không có bản sao lưu.
Lỗi phần mềm: Lỗi trong phần mềm hoặc hệ điều hành có thể dẫn đến hỏng cơ sở dữ liệu.
Tấn công mạng: Tấn công từ hacker có thể xóa hoặc làm hỏng dữ liệu.
Lỗi của người dùng: Những thao tác nhầm lẫn như xóa dữ liệu hoặc ghi đè dữ liệu cũng có thể gây mất mát thông tin.
2. Các phương pháp Backup MySQL Database
2.1. Sử dụng lệnh “mysqldump”
mysqldump là một công cụ dòng lệnh phổ biến được tích hợp sẵn trong MySQL. Nó cho phép sao lưu toàn bộ cơ sở dữ liệu hoặc từng bảng riêng lẻ.
Cú pháp cơ bản:
mysqldump -u [username] -p [database_name] > [backup_file].sql
Trong đó:
[username] là tên người dùng MySQL.
[database_name] là tên của cơ sở dữ liệu bạn muốn sao lưu.
[backup_file].sql là tên tập tin sao lưu sẽ được tạo ra.
Ví dụ:
mysqldump -u root -p mydatabase > mydatabase_backup.sql
2.2. Sử dụng “mysqlpump”
mysqlpump là một công cụ sao lưu mới hơn so với mysqldump và được tối ưu hóa để nhanh chóng sao lưu cơ sở dữ liệu lớn bằng cách thực hiện song song.
Cú pháp cơ bản:
mysqlpump -u [username] -p [database_name] > [backup_file].sql
Ví dụ:
mysqlpump -u root -p mydatabase > mydatabase_backup.sql
2.3. Sử dụng “XtraBackup”
XtraBackup là một công cụ sao lưu từ Percona, cho phép sao lưu nhanh chóng và không làm gián đoạn hoạt động của cơ sở dữ liệu. Đây là lựa chọn tốt cho các cơ sở dữ liệu lớn và hệ thống yêu cầu cao về thời gian hoạt động.
Cài đặt Percona XtraBackup:
sudo apt-get install percona-xtrabackup-24
Thực hiện sao lưu:
xtrabackup --backup --target-dir=/path/to/backup/dir --user=[username] --password=[password]
2.4. Sử dụng lệnh SQL
Ngoài các công cụ dòng lệnh, bạn cũng có thể sao lưu cơ sở dữ liệu bằng cách xuất dữ liệu trực tiếp từ MySQL Workbench hoặc sử dụng các lệnh SQL.
Xuất dữ liệu từ MySQL Workbench:
Mở MySQL Workbench.
Kết nối đến cơ sở dữ liệu của bạn.
Chọn cơ sở dữ liệu cần sao lưu từ danh sách.
Chọn "Data Export" từ menu.
Chọn các bảng hoặc toàn bộ cơ sở dữ liệu để xuất và chọn định dạng tập tin.
Sử dụng lệnh SQL:
SELECT * INTO OUTFILE '/path/to/backup_file.csv' FROM table_name;
3. Lên lịch Backup MySQL Database tự động
Việc sao lưu thủ công có thể không hiệu quả đối với các hệ thống lớn hoặc có tần suất cập nhật cao. Do đó, việc thiết lập sao lưu tự động là cần thiết. Để thực hiện điều đó bạn có thể sử dụng các cách như sau:
3.1. Sử dụng Cron Jobs (Linux)
Cron là một trình lập lịch công việc tự động trên các hệ thống Unix-like. Bạn có thể tạo một cron job để tự động sao lưu cơ sở dữ liệu MySQL.
Bước 1: Mở trình chỉnh sửa cron
crontab -e
Bước 2: Thêm dòng lệnh sau để sao lưu hàng ngày lúc 2h00
0 2 * * * /usr/bin/mysqldump -u [username] -p[password] [database_name] > /path/to/backup/dir/[backup_file].sql
3.2. Sử dụng Task Scheduler (Windows)
Trên Windows, bạn có thể sử dụng Task Scheduler để lập lịch sao lưu tự động.
Bước 1: Mở Task Scheduler.
Bước 2: Tạo một tác vụ mới và thiết lập thời gian, tần suất chạy tác vụ.
Bước 3: Thêm hành động chạy tập lệnh sao lưu.
"C:\Program Files\MySQL\MySQL Server 8.0\bin\mysqldump.exe" -u [username] -p[password] [database_name] > C:\path\to\backup\dir\[backup_file].sql
4. Kiểm tra và khôi phục dữ liệu
Backup MySQL Database chỉ thực sự có giá trị khi bạn có thể khôi phục nó một cách chính xác. Do đó, việc kiểm tra định kỳ các tập tin sao lưu và quy trình khôi phục là rất quan trọng.
4.1. Kiểm tra sao lưu
Bạn nên định kỳ kiểm tra các tập tin sao lưu để đảm bảo rằng chúng không bị hỏng và có thể sử dụng được khi cần thiết.
Ví dụ:
mysql -u [username] -p [database_name] < /path/to/backup/dir/[backup_file].sql
4.2. Khôi phục cơ sở dữ liệu
Khôi phục cơ sở dữ liệu từ tập tin sao lưu có thể được thực hiện dễ dàng bằng lệnh mysql.
Cú pháp:
mysql -u [username] -p [database_name] < [backup_file].sql
Ví dụ:
mysql -u root -p mydatabase < mydatabase_backup.sql
Kết Luận
Backup MySQL Database là một quy trình quan trọng và cần được thực hiện định kỳ để bảo vệ dữ liệu của bạn. Bằng cách sử dụng các công cụ và phương pháp sao lưu khác nhau như mysqldump, mysqlpump, XtraBackup, và thiết lập sao lưu tự động, có thể đảm bảo rằng dữ liệu của bạn luôn an toàn và có thể khôi phục nhanh chóng khi cần thiết. Đừng quên kiểm tra định kỳ các bản sao lưu để đảm bảo tính toàn vẹn và khả năng khôi phục của chúng.
Nguồn: https://suncloud.vn/backup-mysql-database
0 notes
Text
はい、MySQLでは「REPLACE」ステートメントを使用して、「INSERT OR REPLACE」のような動作を実現することができます。このステートメントは、新しい行がテーブルのPRIMARY KEYまたはUNIQUEインデックスと同じ値を持つ古い行がある場合、古い行を削除してから新しい行を挿��します¹。
基本的な構文は以下の通りです:
```sql
REPLACE INTO テーブル名 (カラム1, カラム2, ...)
VALUES (値1, 値2, ...);
```
また、「INSERT ... ON DUPLICATE KEY UPDATE」ステートメントもあり、これは新しい行が既存の行と重複する場合に、その行を更新するために使用されます³。
どちらの方法も、データベースにデータを登録する際に、既存のデータを更新するか新しいデータを挿入するかを柔軟に扱うことができるため、非常に便利です。ただし、「REPLACE」はMySQL特有の拡張であり、他のデータベースシステムでは利用できないことに注意が必要です²。
ソース: Copilot との会話、 2024/6/16
(1) MySQL :: MySQL 8.4 Reference Manual :: 15.2.12 .... https://dev.mysql.com/doc/refman/8.4/en/replace.html.
(2) MySQL :: MySQL 8.0 Reference Manual :: 15.2.7 INSERT .... https://dev.mysql.com/doc/refman/8.0/en/insert.html.
(3) MySQL で INSERT と UPDATE を1文で実現する ~REPLACE .... https://www.united-bears.co.jp/blog/archives/2786.
0 notes
Quote
準備に1年半掛けてるのは流石としか。癖でマスタ/スレーブと言いたくなるがプライマリ/レプリカ呼びなのね。先にレプリカ側を8にし、24時間稼働し確認をとり問題ないとみるやプライマリに切り替える手法
[B! mysql] GitHub、1200台以上のMySQL 5.7を8.0へアップグレード。サービス無停止のまま成功させる
4 notes
·
View notes
Text
Ubuntu 24.04LTS w/ PHP 8.3 and MySQL 8.0 Available!
New OS and PHP Version!
Starting on April 28, 2024, all *NEW* VPS orders will have Ubuntu 24.04LTS (long-term support) with PHP 8.3 selected as the default OS for deployment. However, Ubuntu 22.04LTS with PHP 8.1 will continue to be an option during the sign-up process and will continue to be available for both new servers and upgrades (from older LTS releases) until end of April 2026. As always, please check server requirements for your specific web applications. You will want to review your web application requirements before selecting your OS option or requesting an upgrade.
Upgrade Options
As a reminder, pre-existing VPS servers running earlier Ubuntu LTS releases will have Ubuntu 24.04LTS or 22.04LTS as upgrade options but you will need to order a new server for the OS/PHP upgrade. This will allow you to do full testing with your site and control your upgrade/deployment time frame. Once completed, you can update DNS to point your traffic to the new server and cancel your existing server. For more details, please take a look at our Knowledge Base article - OS / PHP / MySQL Release Schedule and Upgrade Process.
Ubuntu 20.04 LTS Reaches "End of Life"
The Ubuntu 24.04LTS release moves our Ubuntu 20.04LTS installs into an End of Life status as Ubuntu will only provide one more year of OS updates and security patches. If you see accounts listed in the Account Portal as running a “Retired” or “End of Life” OS, you will want to work on upgrading to Ubuntu 24.04 or 22.04 as soon as possible. While you are not required to upgrade to Ubuntu 24.04 or 22.04 at this time, keeping up with OS upgrades, as well as updates to your own web applications, are not only highly recommended but are required to keep you in compliance with PCI for e-commerce sites and possibly other internal/external security requirements.
The Urgent Need To Upgrade "Retired OSs"
Additionally, any VPS server still running under an OS/platform we list as “Retired” has limited to no support from us. We provide limited to no server modifications and our uptime service level agreement (SLA) does not apply. Clients are solely responsible for any security or other impacts that may happen because of this. For these clients, please update to our supported “Current” or “Legacy” OS releases as soon as possible. As always, please reach out to our Support Team if you have any questions.
0 notes
Text
Drupal 11.0 will require PHP 8.3 and MySQL 8.0
Drupal 11 development has reached a point where the system requirements are being raised in the development branch. To prepare core developers for this and to inform the community at large, we are announcing the following requirements for Drupal 11. … Drupal 11 will require PHP 8.3 and older versions of PHP are not supported. … The minimum database requirements for backends supported by Drupal 11…
View On WordPress
0 notes